System monitoring service
In the Arduino firmware section, we see how to read battery voltage using Arduino via the ADC sensor and communicate this information with ROS 2. It is up to our ROS implementation to decide what to do with this data. Basically, we can implement a dedicated battery protection node in ROS 2 that monitors the battery voltage and if necessary turn off the robot in case of low power. This is easily to implement thanks to the ROS 2 API. The only downside is that such a simple but vital feature depends heavily on the ROS middle-ware. Running the service involves other dependent ROS services, one failure at the middle-ware level will turn down and disable the protection service.
For system safety, it is recommended that the battery protection service belongs to system services at low level and is independent of the ROS middle-ware. This service starts when the system boot up and restarts automatically in case of failure. On Ubuntu, this can be a systemd service.
Battery status reading directly from the Jetson Nano
Our battery protection service will need to read the current status of the battery for sure.
In the previous section, we use the the Arduino to read the battery voltage using the ADS1115 ADC sensor. Unfortunately, as the Arduino communicates exclusively with ROS, getting battery information outside of ROS is not feasible in this case.
One option is to modify a little bit the hardware configuration to allow the Jetson Nano to collect directly the battery information from the ADC sensor. This is possible since the sensor has an I2C interface that is also available on the Nano. The wiring follows the same principle detailed in the Arduino section (including the voltage divider), except that the ADC 1115 is connected directly to the Nano via GPIO instead of the Arduino.
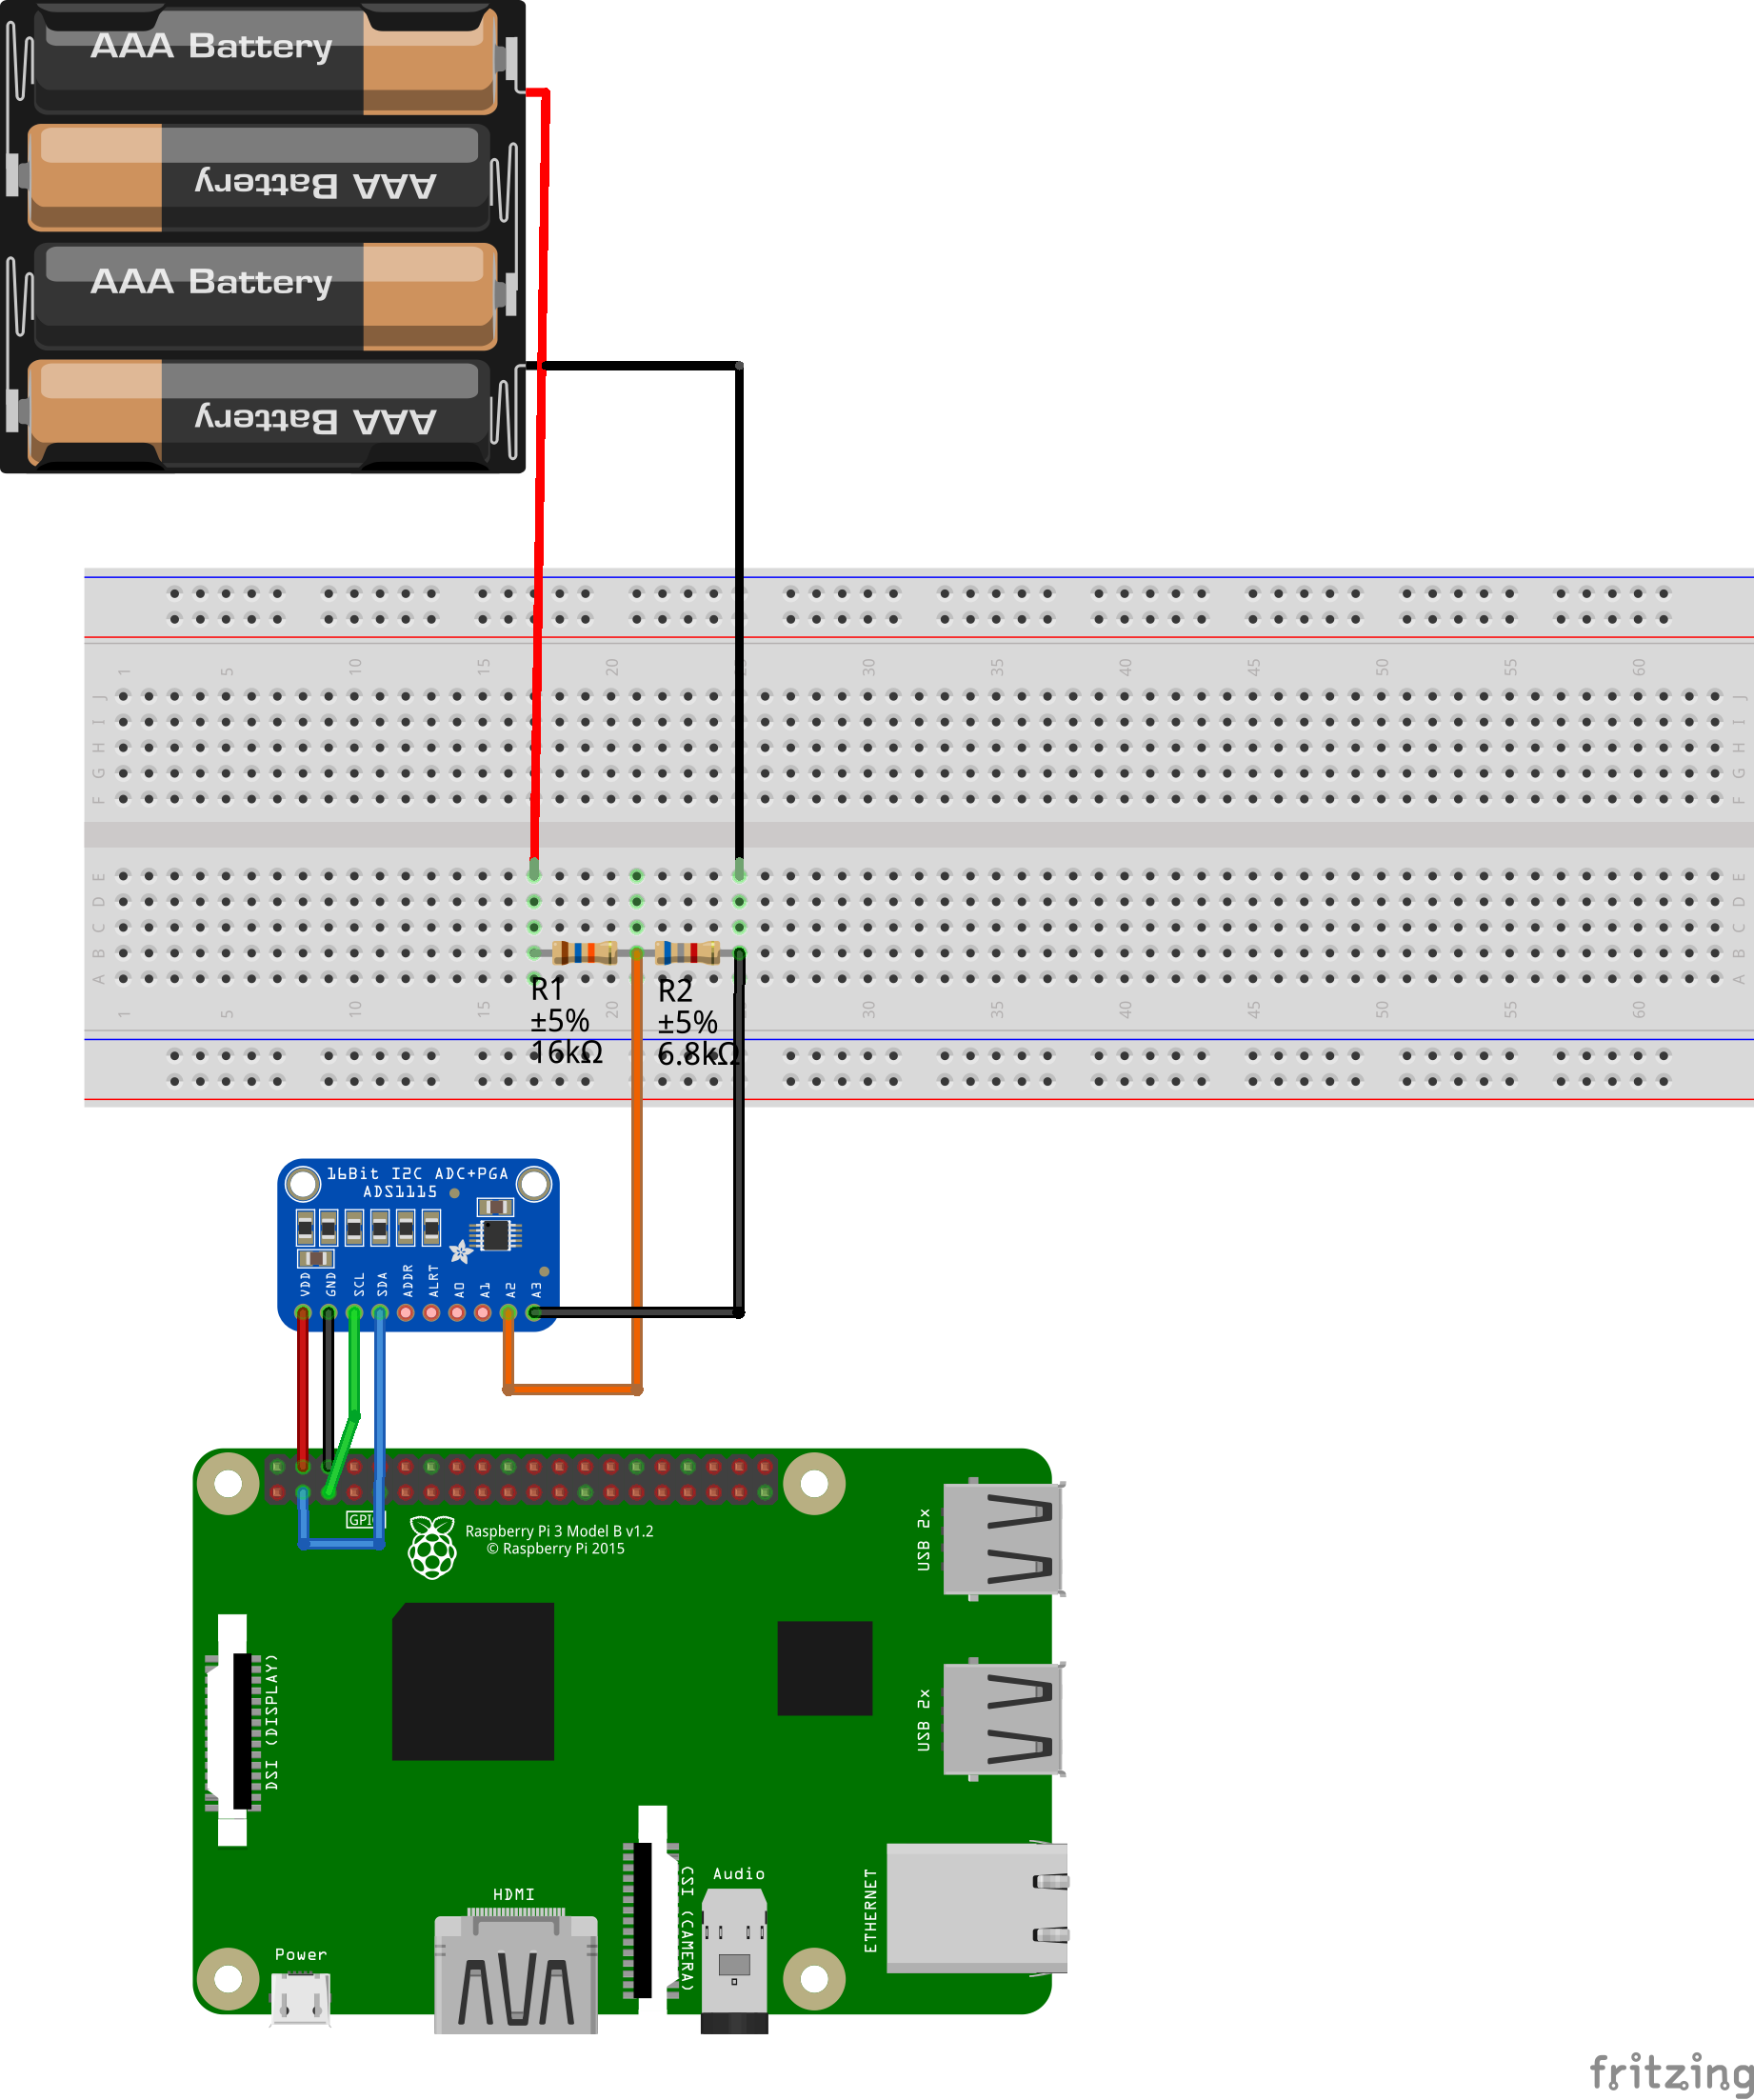 (The wiring example is for Raspberry Pi but it is also applicable for Jetson Nano since the two SBC share the same GPIO layout)
With this configuration, the Arduino is no longer in charge of battery monitoring. It is now the responsibility of the Linux system (kernel) to read data from the ADC 1115 sensor and make it accessible in user space via a standard interface such as the sysfs interface. The ROS middle-ware can fetch battery voltage directly from this interface instead of from the Arduino. One advantage of this approach is that any application (including ROS + our battery protection service) can consult the battery status via the sysfs interface without relying on a specific middle-ware.
One down side of this method is that we need a Linux driver for the sensor to exposes the hardware to user space using the sysfs interface. The linux driver for ADC 1115 exists but we need a little bit of modification on the device tree to make it work on the Jetson nano.
The source code of the linux driver is already included in the jarvis repository as submodule. The driver code is a fork of the sensor driver in the mainline kernel. The important modification is to add the device tree overlay that allows the kernel to access to the sensor via the I2C interface (i2C1 in this case) using the driver.
Compiling the kernel module requires the source(headers) of the current kernel, for the Jeson Nano, this can be downloaded directly from the NVDIA dowload page.
Download the public_sources.tbz2 for Jetson Nano from here. Note that, the build process will be performed on the Jeson board.
mkdir ~/jetson
cp public_sources.tbz2 ~/jetson
cd ~/jetson
# extract the public source
tar xf public_sources.tbz2
cd Linux_for_Tegra/source/public/
# extract the kernel sour
tar xf kernel_src.tbz2
# prepare the build environment
cd kernel/kernel-4.9/
cat /proc/config.gz | gunzip > .config
cp /usr/src/linux-headers-4.9.140-tegra-linux_x86_64/kernel-4.9/Module.symvers .
make scripts prepare modules_prepare
Now build the ADS1115 kernel module:
cd ~/workspace/ads1115-driver
KERNEL_SRC=~/jetson/Linux_for_Tegra/source/public/kernel/kernel-4.9 make
After the build done, test the module by:
sudo insmod ads1015.ko
Then using lsmod to see if the kernel is inserted successfully.
Add the module to system by:
sudo cp ads1015.ko /lib/modules/4.9.140-tegra/kernel/drivers/i2c/
sudo depmod
Make the module loaded automatically on boot by adding ads1015 to /etc/modules
# execute as root
echo "ads1015" >> /etc/modules
One last step is to copy the device tree overlay to the boot partition:
sudo cp ads1115-overlay.dtbo /boot/
#  registe to system
sudo /opt/nvidia/jetson-io/config-by-hardware.py -n "ads1115 Overlay"
From now on, when booting, the sensor is exposed in user space at: /sys/class/hwmon/hwmon2/device/*:
/sys/class/hwmon/hwmon2/device
├── driver
├── hwmon
├── in0_input
├── in1_input
├── in2_input
├── in3_input
├── in4_input
├── in5_input
├── in6_input
├── in7_input
├── modalias
├── name
├── of_node
├── power
├── subsystem
└── uevent
The driver exposes all 8 ACD input channels to user space as follow:
in0_input: Voltage over AIN0 and AIN1.in1_input: Voltage over AIN0 and AIN3.in2_input: Voltage over AIN1 and AIN3.in3_input: Voltage over AIN2 and AIN3.in4_input: Voltage over AIN0 and GND.in5_input: Voltage over AIN1 and GND.in6_input: Voltage over AIN2 and GND.in7_input: Voltage over AIN3 and GND.
Since our battery connect to the sensor via AIN2 (Vout of the voltage divider) and AIN3 (GND), the battery voltage reading is available at the input channel in3_input.
The battery voltage can be read using cat command:
cat /sys/class/hwmon/hwmon2/device/in3_input
# example output in mV
3251
This file-based interface allow any application to fetch battery status using a simple read operation.
System monitoring and battery protection service using sysmond
Now that the battery status is available system-wide, we can use sysmond to monitor and protect the robot battery.
sysmond is a simple service that monitors and collects system information such as battery, temperature, memory, CPU, and network usage. The service can be used as backend for applications that need to consult system status. Although it is a part of Jarvis ecosystem, sysmond is a generic service and can be easily adapted to other use cases.
The source code of sysmond is included in the jarvis repository as submodule and available at a separated git repository: https://git.iohub.dev/lxsang/sysmond. More information on the service can be found in the git page.
Basically, sysmond monitors resource available on the system via the user space sysfs interface.
The service logs all system information to application using a classic file-based interface, it can be configured to log system information to:
- Regular text file (such as log file)
- Name pipe (FIFO), the name pipe file should be previously created by application
- STDOUT
- UNIX socket domain, as with name pipe, the socket file must be previously created by application
Additionally, if configured correctly, the service can monitor the system battery and automatically shutdown the system when the battery is below a configured threshold. sysmond is lightweight and can be used in embedded linux system, or single board computer such as Raspberry Pi or Jetson Nano.
build and install sysmond
cd ~/workspace/sysmon
libtoolize
aclocal
autoconf
automake --add-missing
./configure
# build
make
#install
make install
A systemd service will be installed on the system, enable it by
sudo systemctl enable sysmond
start it:
sudo systemctl start sysmond
Service configuration
The default configuration file can be found in /etc/sysmond.conf. Specific configuration file can be passed to the service using the -f option.
sysmond -f /path/to/your/sysmond.conf
More information on the configuration can be found on the git page, a typical configuration for Jarvis is:
# Battery configuration
battery_max_voltage = 12600
battery_min_voltage = 10000
battery_cutoff_voltage = 9000
battery_divide_ratio = 3.36
battery_input = /sys/class/hwmon/hwmon2/device/in3_input

# daemon configuration
# time period between loop step in ms
sample_period = 500

#number of cpus to monitor
cpu_core_number = 4

# network interfaces to monitor
network_interfaces = wlan0
# e.g. wlan0,eth0

# disk mount point to monitor
disk_mount_point = /

# when battery is low
# the system will be shutdown after n count down
power_off_count_down = 10

# the system will be shutdown if the battery voltage percent is below this value
power_off_percent = 3

cpu_temperature_input=/sys/devices/virtual/thermal/thermal_zone1/temp

gpu_temperature_input=/sys/devices/virtual/thermal/thermal_zone2/temp

# output system info to file
data_file_out = /var/fbf070ddea3ea90d07f456540b405d302554ec82
Restart the service after modifying the configuration:
sudo systemctl restart sysmond
Based on these configuration, sysmond can approximate the battery voltage percent, it is also able to protect the battery by powering off the system when the battery percent bellow the configured value (3%).
The service approximates the battery percent using the following voltage --> percent asymmetric sigmoidal approximation function:
$$c=101-\frac{101}{(1+\frac{1.33\cdot x}{y}^{4.5\ })^{3}}$$
With \(x=v_{read}-v_{min}\) and \(y=v_{max}-v_{min}\)
This function models the battery consumption during time as the following curve, which is pretty closed to the real battery discharge curve:

Visualize system resource with AntOS
This step is optional.
sysmond monitors not only the robot battery but also other system resource such as memory, network, CPU, temperature. It outputs system information to other application in JSON format via a file-based interface. Other application can easily parse the JSON data and visualize it using real-time graphs.
AntOS offers a web based interface to access to Jarvis resource using web browser, thus it is able to visualize system resource using an Antos Application.
Instruction on installing AntOS on Jarvis can be found here (third section).
Connecting sysmond to the web server
To send system information to AntOS, the sysmond need to connect to the webserver via the tunnel plugin which is already installed.
Remember that we configured the output of sysmond as data_file_out = /var/fbf070ddea3ea90d07f456540b405d302554ec82. Now we need to pass this file to the tunnel service by modifying the following file:
sudo nano /opt/www/runner.ini
And modify it as follow
[RUNNER]
service=/opt/www/bin/vterm /opt/www/tmp/channels/antd_hotline.sock
service=/opt/www/bin/wfifo /opt/www/tmp/channels/antd_hotline.sock sysinfo /var/fbf070ddea3ea90d07f456540b405d302554ec82 r
This allow to create a name pipe /var/fbf070ddea3ea90d07f456540b405d302554ec82 and connect the tunnel service to the sysmond service via this pipe.
Note down the topic name sysinfo, we will use it in our monitoring application.
Now restart the tunnel services:
sudo systemctl restart antd-tunnel-publisher
The sysmond output is now streamed to AntOS via the tunnel plugin (as websocket stream)
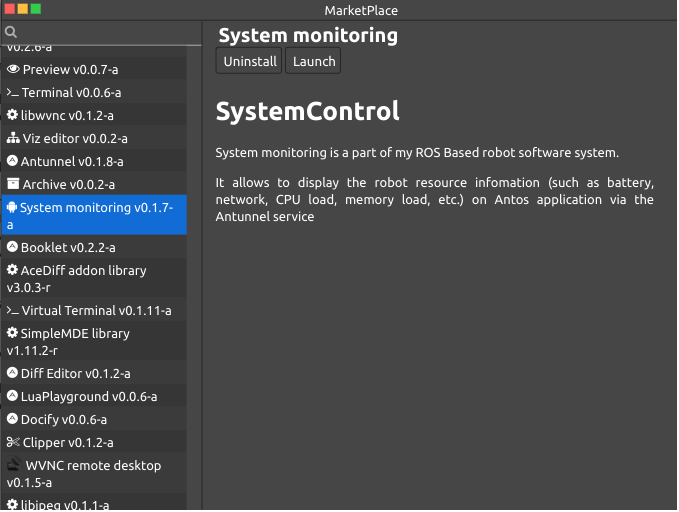
Install the AntOS System Monitoring application
From AntOS open the Market Place application and install the System Monitoring application.
Since this application depends on the Tunnel service, this service need to be started automatically. Open the System setting application, in the Startup tab, add the Antunnel/AntunnelService service at startup as follow:
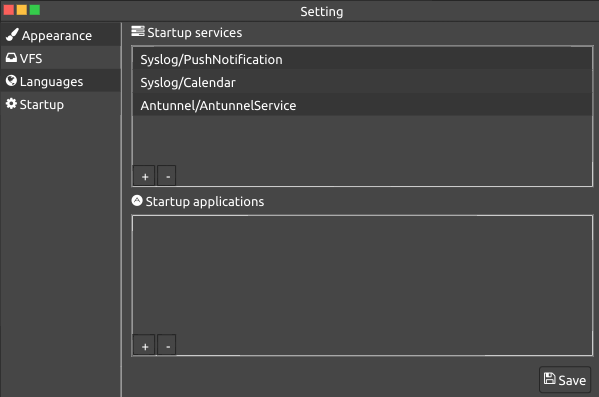
Press save to save change, and refresh the page, the service should start automatically and the Tunnel icon appears in the top right system tray. Connect to the tunnel service on the server side via the system tray menu, the system will ask for a socket connection to the tunnel service, enter the following URL:

wss://ROBOT_IP/tunnel
Replace ROBOT_IP by the actual IP of the robot. AntOS should connect successfully to the server side tunnel service.
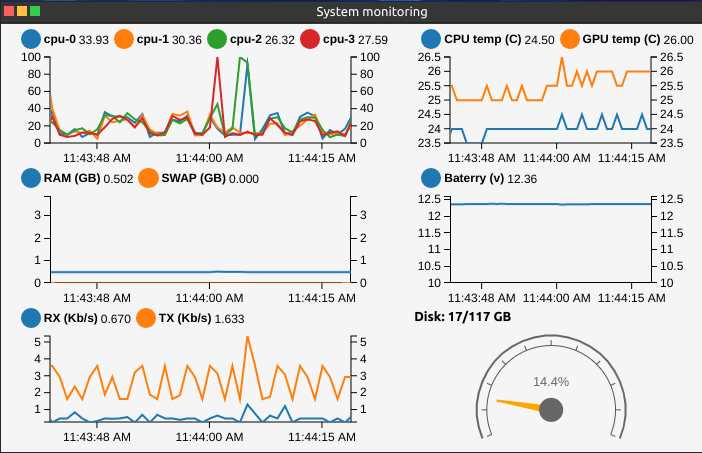
Now open the System monitoring AntOS application, at first launch the application will ask for the topic name where the system information data is available, enter the topic name we noted before sysinfo. The application will fetch the data and visualize it as follow:
Comments
The comment editor supports Markdown syntax. Your email is necessary to notify you of further updates on the discussion. It will be hidden from the public.